They are sitting ducks while crossing and coming out.Pratyush wrote:To the gurus just a nube sawal,
Why is a DCB considered a serious obstacle when an army can deploy tanks that can ford upto 5 meters of water. Or when the ICVs have full amphibian capabilities.
Conduct your own war
Re: Conduct your own war
Re: Conduct your own war
per the US field army manual there are 3 forces
- breaching force - that may mean engineer vehicles, a few tanks, ploughs, ....
- covering force - will protect the breaching force
- assault force - this will move through the gap to assault the next objective.
so for tanks and IFVs attempting to cross a canal or river, would there not be a protection complement that is doing direct fire from the shore on any targets in the opp bank, and artillery and mortars pounding any detected strongpoints from which enemy might attempt to counterattack or deploy ATGMs?
Re: Conduct your own war
Pratyush, DCB could be a serious obstacle if they are seriously defended. Rohit choses to base his main defense line on the canal which is an even bigger obstacle.
The problem with mechanized forces and DCB is not just the water, but the steep inclines on the sides. How are the tanks supposed to negotiate them? The water is just the icing on the cake to complicate things. DCBs would remain quite daunting even in a drought with no water.
The problem with mechanized forces and DCB is not just the water, but the steep inclines on the sides. How are the tanks supposed to negotiate them? The water is just the icing on the cake to complicate things. DCBs would remain quite daunting even in a drought with no water.
Re: Conduct your own war
Singha, yes some forces will provide covering fire while some others attempt a crossing, thats standard. The catch is the defenders are much better bunkered down in the ideal locations and have excellent field of fire etc. The west side of the canal approaches could even be graded b the RLF before hand so as not to provided much cover for the attackers. In any case the attackers will be exposed both on the banks and those in the water.
Re: Conduct your own war
Sorry, but you made a wrong assumption. May be I should have been more elaborate but you could have read-up on the defensive operations before making the above assumption and stated the assumption upfront when you wrote your response. The setting is a classic case of Defense in Depth and it means that there will be various defensive lines - each meant to slow the enemy advance and degrade his offensive potential. The idea is to trade land for time.KiranM wrote: The overlapping fields of fire are westwards of canal towards DCB. In your original post you did not mention anything about placements between canal and gap. 3AA is landing eastwards of canal coming up behind the forces at canal who are facing westwards towards DCB.
The canal is just happens to be amongst the strongest defense line but not the only one.
KiranM wrote: The overlapping fields of fire are westwards of canal towards DCB. In your original post you did not mention anything about placements between canal and gap. 3AA is landing eastwards of canal coming up behind the forces at canal who are facing westwards towards DCB.
The RLF has 3,000+ infantry in the sector along with one additional reserve infantry battalion of around 800+ troops. Can you can please tell me what will 2 companies or ~240 men achieve in such a setting and that too towards west of the canal? And even if assuming that RLF forces have placements only on the western bank of the canal, you think someone will just let those 3AA troops be? And that too against such heavy armed enemy force? The companies have been landed on the D-Day and as per your own scenario, it has taken BLF 12+hours just to breach the DCB? What do you think will happen to the 3AA troops in this period – provided they survive the landing in the first place itself? Also, what prevents the RLF from simply placing their machine guns eastwards and take down the BLF choppers when they come in to land?
Again, what kind of fantasy play is this? How do you know where the MANPAD and OP teams are on the ridge? The damn thing runs 50kms on either direction of Z-Gap. So, how did you just think you can blind the MANPADS? Did IA manage to blind the PA MANPAD teams in Kargil?KiranM wrote:I said set up smoke screen at ridge (to blind the MANPADs teams), at DCB (to blind the forward OP), at canal (to blind canal OP) and area between canal and DCB (to give the assumption for canal holders that something is happening Westwards towards DCB and to be alert for anything coming towards them. All this to divert their attention from behind eastwards towards gap where 3AA is landing and taking up positions.) No where have I said smoke between canal and gap. So sir, while canal RLF are blinded 3AA is not. Also Canal RLF will blow up the bridges only after they move eastwards across it. They cannot now since 3AA are taking up positions on the eastward end of bridges and moving westwards bottling them up.
As for 3AA landing behind the canal “silently” and surprising them, have you seen an air-assault video? 240 men plus their equipment means at least 30*8 Mi-17 category helicopters – have you any idea what ruckus those Mi-17 are going to create and how big those choppers are? And they are sitting ducks as they come in land or hover over the DZ.
As for the smokescreen – well, it is not a panacea for all the ills of the battlefield.
1.You cannot maintain a smokescreen behind the DCB w/o it affecting the crossing of the DCB by BLF itself.
2.Also, if smoke screen lowers the visibility of RLF, it does the same for BLF as well. How will the BLF forces know where to breach the DCB and guide follow on forces? How do you know where RLF forces and teams are? Will not the smokescreen prevent BLF from putting a fix on RLF defenses? Won’t they be running blind as well?
3.You think they’ll stay put in their bunkers or pill-boxes and not move towards alternate positions and take out the crossing BLF forces?
4. And there are many a countermeasures for smokescreen itself. With most simplest of them being small bombs in a “ladi” like one uses in Diwali – these create such a strong sound that these are used to shatter the smokescreen. And this I saw good 15years back.
Re: Conduct your own war
Those are very good points and reference for the overall conduct of the battle. Just my 2 cents:bmallick wrote:Let’s move backward from taking the town to the gap to the canal to the DCB. Lets see how much force is required at each stage & what needs to be done to attain objective for that stage. This way we back calculate to what needs to be the objectives in the previous stage.
Objective 1 Taking of the town:
- Assault into the town from north, south highway & highway leading from the Gap to the town.
Assault from the North or South is not possible because of the presence of the Ridge 50kms on either side of Z-Gap. Hence, the town cannot be outflanked. It would mean coming up or going down 50kms from a break-in point south or north of Z-Gap. Also, there are RLF formations in those areas to impede the advance. And time factor comes into play.
The 4-lane highway from Gap to Town would be our MSR. Hence provide protection from flank attacks to it. Widen security perimeter to 4-5 km on either side, to prevent Red counter attack on this, which can result in your main force being cut-off and encircled.
Good point. You do not want Red Land forces to attack from north or south the advance axis in the middle. The flank will need to be protected. However, what BLF forces can do is launch attacks towards north and south and roll up RL defenses in other sectors as well. This will automatically give protection to flanks as well.
The same applies to flank between Canal and the Z-Gap. You can roll the enemy defenses north or south of it.
- If possible destroy the bunkers & strong points around points where bridges would be established, else at least suppress them, till the bridges are put in place and assault forces get across.
Before the bridges can be placed on the DCB and Canal, a bridgehead will need to be established across the DCB and Canal. This means that BLF need to capture the west bank of the canal and DCB. For this to happen, the BLF will have to secure the east bank of the canal and DCB first and put to strong suppressive fire. The idea will be to take out the enemy defenses on western side of Canal or DCB or suppress them to such extent that the lead elements can crossover. These forces will have to capture the west bank of the DCB/Canal to establish the bridgehead.
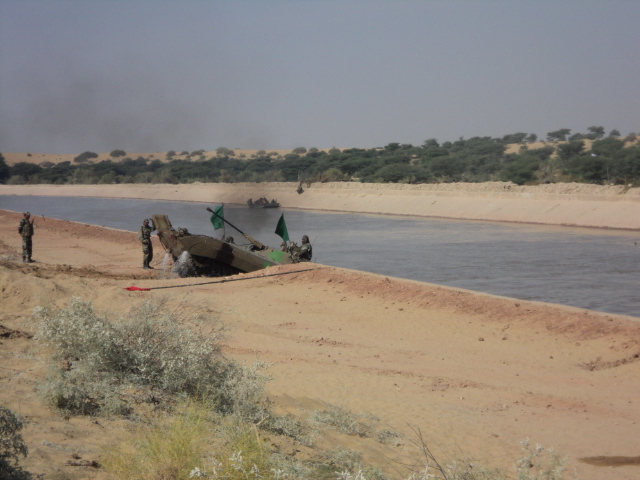
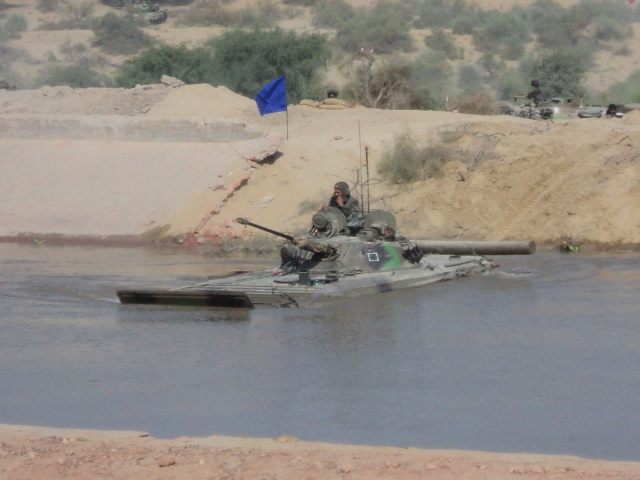
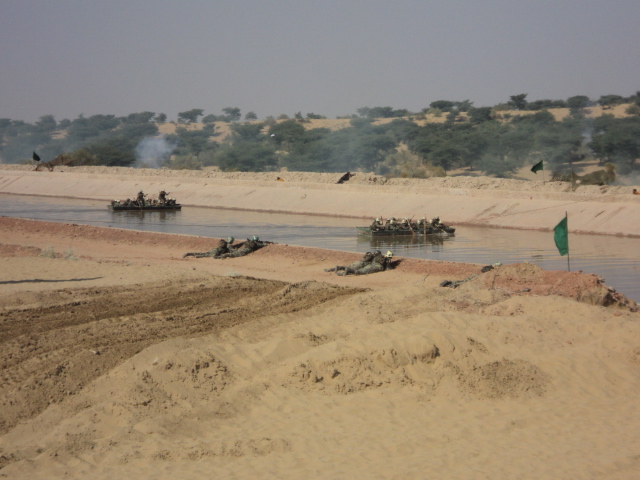
This is where the fording capability of the Tanks and Swimming capacity of the BMP-2 come into play. First, The berms of the DCB and Canal will have to be blow away – this is where the DRDO product comes into play. This will allow the Tanks and BMPs to lower themselves into the water and cross over.
Please see the pictures from the Livefist. You can clearly see infantry/engineers going across the Canal and then the BMP-2 following on their own power. You can see that the BMP-2 cross-over at point where the canal/DCB bank does not have cemented surface. DCB/Canal berms need to be breached and gap clearly established.
http://livefist.blogspot.com/2011/11/in ... rgame.html
Re: Conduct your own war
Based on the posting's made till now & reading up from the internet, the conclusion what I have drawn is that the initial crossing has to be done by the Infantry. The infantry soldier has to slug it out across the DCB & Canal, get into the high trenches & over power the enemy infantry there. Use the trenches as cover and since the trenches would be any way connected to the Strong points, use the trenches to assault the strong points. The trenches are not the strong points, hence easier to overpower. Also they do provide natural protection and the artery of the whole defensive setup. So provide good suppressive fire, direct as well as indirect to the nearest strong point, assault the trench on the run & move. This is going to be done the old fashion way man-o-man, bayonet.
Only when the infantry has secured a bridgehead on the west side of the DCB/Canal & provide suppressive fire from there , then only the engineers can go about doing their work safe behind BLF's infantry line. This would let the armor roll in & then broaden the bridgehead, secure all area. If you try to make BMP's cross without a secure bridgehead, RLF defenders can simply take put shots at the slow moving BMP's. Moving large number of tanks across the DCB to the area between the DCB & Canal would be mean too much armor concentration in a small area. Hence just move enough number to destroy the strongpoints, but not so many that enemy artillery has a field day. The tanks are good when they are hitting & moving, but is they become stagnant they are in real danger. Hence the heavy armor needs to move in only when crossing the Canal, so that there is sufficient area to play around. Hence when the BLF forces are making a crossing for the Canal, then move the heavy armor across the DCB in numbers, so that once the bridgehead is secured and bridges ready, armor move in quickly and goes for a break through. However, on second thought armor can be brought in right after the DCB crossing, to roll to the north & south of the assault area & secure the flanks.
Hence BLF infantry has to cross first & enter into a slugfest and secure a bridgehead. This has the following advantage too. Since the infantry is making the crossing, BLF can have fairly large number of boats, maybe 50-60, each having 6-10 men, to do the crossing over a slightly dispersed front maybe 2-3 kms wide. The DCB berm on the west side, i.e the area between the water & berm, would provide natural protection because of the high berm. Thus infantry can use that for protection. Moreover, with that large number of boats doing the crossing, a very good numbers would be able to make it across. Once hidden behind the berm on the west side, the infantry can regroup and move around. The natural protection of the berm means the enemy has no idea of where infantry concentration is, thus would have to fire artillery shells over a large area. The crossing can be provide cover by, heavy fire from the east berm of the DCB. Of course it would also need protection from enemy artillery, which would be its biggest threat. Thus need to provide very effective counter battery strikes, which even if does not destroy the enemy artillery pieces, at least causes them to do shoot & scoot. Thus reducing there sustained fire capability significantly. My artillery would be only doing counter battery strike, thats there only job when the crossing is being done. Please note that the DCB area is the only place where enemy artillery can hit me while my men are crossing, once the crossing is done & my infantry closes in with enemy trenches & strong points, they would have difficulty in calling an artillery strike because of fear of friendly fire. Hence enemy artillery is a major threat only till close contact is made between the opposing forces.
Once the wave of infantry gets to the berm on the west side, it uses that berm as new base of fire, thus allowing infantry providing covering fire from the east berm to do the crossing. Basically classic fire & maneouvre. Please note it would be stupid to think that all forces would reach west berm at the same time start covering fire , i.e every thing happening in good synchronisation. So what I would rather like is there is coordination of troops over smaller area, i.e Coy A do the crossing in one area. With platoons 1 making the crossing, platoon 2 & 3 providing covering fire. Then P2 does the crossing, with P1 & P3 providing cover, then P3 does the crossing with P1 & P2 providing cover. The actual crossing for the company is done over a front of 100-200 ms. using 3-4 boats per platoon. what this means is that the boats are fairly dispersed, also have room on either side of them to follow zig-zag path, thus causing more confusion for enemy artillery FAO on ridge. Please note that because of the berm on the west side, enemy forces on the west of DCB cannot do much, except provide indirect fire. For direct fire they need to get to the berm, which is being targeted by atleast 2 platoons. Once across the company would regroup, sheltered by the berm. The use the berm as base of fire, set up heavy fire power there and move to attack the nearest trench. Over power the force in the trench, use trench as cover and path, move to the strong point, hit it with Carl Gustav, grenades etc, capture, move on.
Pour more men across, put in maybe 1 more company behind the one which initially made the crossing. Enlarge the bridgehead. Then some engineers do the crossing, destroy the berms on the west side in some places, the BMP's do the crossing and move ahead.
All this while, heavy mortar fire support has to be provide. Hence each company would have extra mortar teams & if possible dedicated 10 mm mortar support. Also each company would have dedicated automatic grenade launcher units, each platoon with ATGM & Carl Gustav fire units. Extra 3-4 heavy machine guns per company.
Once this is done, get the BMP's across the DCB, over the whole front. Get Special tanks troops & BMO units across on the flanks whose task is to protect the flanks. Pour more men & BMP's, secure bridgehead, get bridges across the canal & pour more men & armor to capture the area between the DCB & Canal.
Repeat everything for getting across the Canal. Of course this would need more men & machine. Please note the canal has a depth of 30 ft & water level 20 ft as mentioned by rohit. Now since Rohit has been telling all the while, that the RLF can breach the canal & cause flooding, this means that the water level is atleast at the bare minimum, 1 ft over the ground level on either side. Else he would have to get pumps to pump the water. Which mean that the Canal two would have 8-10 ft of berms on either side, just like the DCB.
Also once the Canal is crossed, get heavy armor across at the earliest & pump in more men to capture the ridges.
This is going to be a slugfest. I think the capture of the GAP & subsequent capture of town would be cheap.
Re: Conduct your own war
I am taking the opportunity to flesh out, amplify and edit my original post. I am also trying to significantly compress the schedule as Rohit's response to KiranM's post indicated we wont have time for it (I was assuming I could use the four-five days for even cold start to get going, evidently not).
===
FORCES
Forces on the front
- An Infantry brigade in the peacetime defensive fortifications (2 Bn + Art Reg deployed, one Bn Inf and armor each in reserve).
- Infantry Bde as reinforcement for the initial breakthrough
- Totals 6 Inf Bn, 2 Amd Reg, 2 Art Reg plus misc
Breakout Forces, In the area, on call, couple of hours away. Elements will peel off and advance as needed by the plan below.
1 RAPID worth of forces + plus 1 Engg Bde
The assault would be coordinated by the following HQ
- A division HQ sized command group
- attached HQ element equal to Indp Art Bde HQ for coordinating fires
- Coy or two of traffic control specialists/MPs
Other offstage Actors
Strike Corps - The McGuffin or the payload. To transit our fulda gap intact. Passengers as far as we are concerned.
Substantial Air Support 2-3 strike Sqns on call (bisons, cats and a few 2Ks) plus whatever is necessary for air superiority in this sector.
Since everyone seems to prefer the ALHs etc, I will take a flight of the aging Akbars if I can get them.
Note:
The artillery command group under the assault HQ will control fires from the Bde art assets from the holding Bde, the breakthrough Bde, and occasionally the neighboring Bde's from the left and right flank, as well the divisional and corps assets (all tubes within range kind of deal). They also have on call a Smerch Regiment innocently sitting 50km away. Not all will be used all the time, but certain preplanned fires missions will use all of these separately or together at various times. Attempt is to mass fires without massing forces - these stunts can't really be pulled off unless forces regularly train for this so I am hand waving this issue away by assuming a special Art HQ Group with signal and liaison people in all neighboring formations to coordinate fires.
PLAN
D1 late afternoon/before dusk
All actions listed happen all start more or less simultaneously
D1N. After Nightfall
===
FORCES
Forces on the front
- An Infantry brigade in the peacetime defensive fortifications (2 Bn + Art Reg deployed, one Bn Inf and armor each in reserve).
- Infantry Bde as reinforcement for the initial breakthrough
- Totals 6 Inf Bn, 2 Amd Reg, 2 Art Reg plus misc
Breakout Forces, In the area, on call, couple of hours away. Elements will peel off and advance as needed by the plan below.
1 RAPID worth of forces + plus 1 Engg Bde
The assault would be coordinated by the following HQ
- A division HQ sized command group
- attached HQ element equal to Indp Art Bde HQ for coordinating fires
- Coy or two of traffic control specialists/MPs
Other offstage Actors
Strike Corps - The McGuffin or the payload. To transit our fulda gap intact. Passengers as far as we are concerned.
Substantial Air Support 2-3 strike Sqns on call (bisons, cats and a few 2Ks) plus whatever is necessary for air superiority in this sector.
Since everyone seems to prefer the ALHs etc, I will take a flight of the aging Akbars if I can get them.
Note:
The artillery command group under the assault HQ will control fires from the Bde art assets from the holding Bde, the breakthrough Bde, and occasionally the neighboring Bde's from the left and right flank, as well the divisional and corps assets (all tubes within range kind of deal). They also have on call a Smerch Regiment innocently sitting 50km away. Not all will be used all the time, but certain preplanned fires missions will use all of these separately or together at various times. Attempt is to mass fires without massing forces - these stunts can't really be pulled off unless forces regularly train for this so I am hand waving this issue away by assuming a special Art HQ Group with signal and liaison people in all neighboring formations to coordinate fires.
PLAN
D1 late afternoon/before dusk
All actions listed happen all start more or less simultaneously
- Action.I : Bund Busting
A. At a point 10 kms or so upriver of the gap a heavy force of bomber aircraft will strike the Canal with heavy bombs and attempt to put multiple breaches in it causing the water to spill out at that breach point. The intent is that doing this might reduce or eliminate the water flow down the Gap in the ZW sector.
B. Another strike 15-20km downriver of the ZW Gap before another likely assault point.
Where exactly the strikes would occur will depend on the topology as well as the location of the feeder streams or similar. Perhaps the canal itself would not be attacked but the small damns at a feeder/containing lakes etc. Whatever is best suitable to significantly drain those canals to prevent heavy flooding according to military engineers in consultation with the civilian irrigation department types.
C. The bund itself would be breeched both upriver and downriver by my flank formations (infantry assault + engineer demols), even if it implies flooding their own operation areas. Since the volume of the BCD is not much I am hoping it will drain rapidly. These ops will be part of the flank units efforts to pin forces in their own fronts as supporting action for my forces.
D. Aerial BDA assessment will follow with scattering AP and a few AT mines around the breached areas to impair repair efforts.
Intended Outcome : Ideal case is this would result in a flash flood in the canal in the Z-sector followed by precipitate dropping of water levels in the canal precluding on-demand flooding of the country side.
Caveat : Problem is that I might need to wait a day or two for the waters levels to completely fall off. I can only afford a few hours wait, still any dropping of water levels can only help me. If RLF is alarmed by falling water levels and flood, they will inundate their own defenses as well. But the flooding will still not be as bad as it could have been. I hope I am not seriously underestimating the volume of water involved.
After this event the RLF is under no misconceptions about BLF plans to cross the IB, the only question is where and when; and Z-sector is one of the likeliest crossing points. Movement warning orders will probably be issued to the RRN fire brigade forces, quickening their response.
Action.II : Artillery Preparation.
This has the following components in rough temporal order.- A. A barrage on known and suspected force concentrations, there likely wont be many of these but an attempt to reach out for the low hanging fruit. Artillery is the prime target. (Smerches)
B. Isolate the battle area into following segments and impede communications and cross reinforcement between them. Bulk of the mining work will be dealt with the MBRLs specially those closing off ZTown and the ridgegap.
- DCB Zone, i.e. IB to canal: Drop the bridges over the canal.
- Canal Zone, i.e. Ridgeline to Canal : timed mines dropped on the ridgegap and approaches
- ZTown Zone, i.e. ridge gap to ZTown : mine the approaches to ZTown
- Separate the Z-sector from the neighboring units. : Bomb and mine the lateral lines of communications between IB and ridge.
Why drop the bridges and mine the very roads you want to use the next day? One is that by the time I am ready to use them the enemy will have dropped those bridges and mined the roads anyway. So instead of allowing him unhindered use of these on his terms I want to deny use of them to either. Note that the mines I am dropping are surface scattered mines (AP/AT varieties) with self-destruct timeouts. These surface scattered mines are relatively easy to clear <b>if</b> you have the MCM troops/gear on hand. I am preparing for an assault crossing of my choosing so I have concentrated plenty of those... how much does the enemy have as general issue?
C. If the vegetation on the ridges behind the canal is of suitable density/type I am going to attempt to set it afire with WP/incendiaries. It includes both the forward and rear slopes (with mortars) as well as the ridgeline.
Why? If this works it might flush out the OPs, infantry (with their ATGMs) and any Armor and help reduce the vegetation where heavier ATGMs and Armor can take cover when they come back. If they forces there do a runner, fires will shift to them as a priority.
D. Preparatory fires on the DCB lines and the IB positions.
E. Hereafter, the artillery provides fire missions on call or for opportunity target (counter battery etc)
The BAF will be out in force.- A. A component will attempt to secure local air superiority in this battle area for the two days. I just assume that this is done. RAF might attack in force and some leakers might get through but on the whole I assume that BAF will aerial surveillance of the battle zone will be attempted.
B. Under the air cover a local BAI campaign will be mounted and sustained day night for the duration of this operation. Major enemy movements towards ZTown or on/along the M1 Highway towards the gap will be hit. If rohit moves his armor and inf Bn before the hostilities during the buildup period he gets a free pass, otherwise we will have to assume that a fraction of them have been attrited by aerial interdiction and that their arrival to deployment areas will be delayed.
C. A few cluster bombs and LGB bunker busters on the Bde HQ area coordinating the defense, followed by some AP/AT mines. If I lack suitable weapons to penetrate the bunkers themselves, I might consider bombing the entrances and exits themselves. This is gamble, if it works even slightly, well and good, if it doesn't I wasted half a dozen bison sorties.
D. Follow On strikes. The bridges that weren't taken down by artillery fire are hit.
E. On call CAS for support of the BLF on the assault.
- A. MCM forces attempt to clear the mines west of the DCB with overpressure rocket charges. The holding Bde's ATGM units provide sniper support.
B. Assault Bde's lead battalion and a squadron or so of the armor regiment in close support move up and assault the DCB.
C. Once the forces reach the bund they will fan out and demolish parts of the bund with explosive charges. This is not the neat reductions by the gap crossing engineers but brute force explosive charges to topple the top part of the bund inward.
D. under the cover of a smoke screen, engineers in ribbed boats will attempt to place charges to blow the top part of the east bund inwards. i.e. any openings over which infantry can clamber through. Perhaps Ghataks with scales or grapnels can help here.
E. Additional Infantry forces are brought to roll up the units along the bund and protect it from local counter attacks. The first Bn consolidates provides cover to the engineers. The Armor is left behind in the lee of the DCB.
F. In failing light, within the bridgehead established by the first Bn, the engineers create multiple new breaches and grade them with dozers etc to make it amenable to vehicular crossing. Light pontoon bridges or rubble filled crossings capable of foot traffic are placed. By the time it is dark the fresh second battalion reinforced with ATGM troops is moved across begins to enlarge the bridgehead inwards.
- A. A barrage on known and suspected force concentrations, there likely wont be many of these but an attempt to reach out for the low hanging fruit. Artillery is the prime target. (Smerches)
D1N. After Nightfall
- Action I : Clearing the canal approaches
I have the whole night to clear the canal-BCD area
A. After dark the heavy bridging companies are brought up, scissors are laid across the graded portions of the DCB crossings.
B. The second infantry battalion plus strong combat engineer reinforcements thrust inland towards the canal.
C. As the bridgehead enlarges and gets some breathing room most of one armored regiment is brought forward to support the infantry. Now its up to the junior officers of the second battalion to push ahead as fast as possible towards the canal. I am counting on better night fighting capability as well as plentiful use of Kornets to quickly reduce the opposition. Engineers will be on hand to clear mines as best as they can or for demolitions. I am assuming that it will be nearly dawn by the time I am clear to the canal zone.
D. The second Bn will dig in once up to the canal along with the armored reg.
E. The third Infantry Bn is used to protect the flanks and widen the cleared zone behind the second battalion. Some elements can be used to reinforce the second Bn if they find the going too rough.
F. In the meantime the first battalion on the DCB is consolidated and moved up to support the second Bn on the canal.
Action II : Reinforce and mop-up
A. DCB zone is mopped up.
B. RAPID elements are brought up
- Action I : Canal Crossing
A. At first light the art HQ group comes into play with heavy preparatory fire along the west side of the canal. Suppressive fire on the west side of the ridge on the artillery positions. CAS is up and ready in the air.
B. One Mech inf bn and an armored bn make the assault crossing and digs in followed by a second wave of another mech bn and armored reg.
D. this large force attempts to punch through towards the defenses towards the ridge gap reducing bunkers as well as fending off armored attacks.
E. Follow on infantry and engineer Bn consolidate and place the scissors, attempt to repair the canal bridges and enlarge the bridgeheads along the flanks.
(What exactly happens here depends on what rohit does with his two armored regiment one of which is probably on the west of the ridge).
Action II: Canal approach mopping
A. The area between the BCD and the canal is mopped up.
- Action I : breakout to ZTown
A hole has been punched in the canal defense line
A. An infantry company + some ATGM each supported by a squadron peels off to cover the forward and on either side of the ridgegap.
B. Preceded by recon elements, an armored bde, an inf bde and supporting units of the RAPID stream towards the ZTown.
C. Akbars are tasked with escort and immediate flank protection of the spearheads.s
D. Infantry companies are peeled off behind the spearhead to protect the flanks along the highway road.
Action II: Much later, the taking of ZTown
A. Mixed armor, artillery, infantry formations break off cross country to cut and sit astride the M1 highway/rail-line cutting off the ZTown. Taking of the ZTown by an infantry bde, with an armored bde covering approaches.
Re: Conduct your own war
Some Observations:
I have no idea how long an particular operation takes. Can this particular objective be taken by these forces in so much time. I really have no idea. I am just guessing.
The initial objectives, and means and methods to take them are fairly easier to make out. The later objectives are harder to take because it becomes nearly impossible to cover all the variables and things that can go wrong. I spent about 15 minutes thinking about what kind of casualties I might take and what all types of counter attack I might have to face. After that I said screw it and pushed in another Inf Bn. In real world this probably wont be a very realistic solution. But on the other hand I dont have a staff to run the numbers either
Using overwhelming force against an limited objective only takes you so far. After a certain while you just have a large number of forces milling about in a small area getting on each others toes. And making an attractive target I might add.
I have committed relatively large number of troops in a small area and by my rough calculation a large fraction of the traffic will be devoted to moving forces forward or medivac. Who is going to supply all those forces on the second day - I have no idea.
Good luck to whoever it coordinating the Strike Corps and ARN etc, you are earning your pay. I assume a large part of the planning is using thumb rules with a large margin of error built in and telling units to make do.
Re: Conduct your own war
^ you are probably right. a CEO cannot make line manager or director level decisions..there are too many such decisions for a CxO panel and only the line managers have the real handle on it. the quality and initiative of Lt.Cols, Cols and Brigadiers is likely the key. if you recall, in the victorious march to baghdad in OIF, there were some field formation commanders who tommy franks replaced for lack of initiative when the war was still on....khan is pretty ruthless in weeding out those who dont align to its multifarious objectives....its put as a "lost the confidence of his commander and replaced by xyz"..on the flip side they also ensure that outstanding commanders are fast tracked up.
Re: Conduct your own war
Guys, please give me sometime. I'll reply to the scenarios posted by various members. Thanx.
Re: Conduct your own war
some useful links for mine clearing etc...
http://drdo.gov.in/drdo/Materials/Charg ... viper).htm
http://drdo.gov.in/drdo/Materials/Charg ... learing%20(Vehicle.htm
http://drdo.gov.in/drdo/Materials/Mine% ... (MAPI).htm
http://drdo.gov.in/drdo/Materials/Rocke ... arance.htm
http://drdo.gov.in/drdo/Materials/Rocke ... RAMBS).htm
http://drdo.gov.in/drdo/Materials/Charg ... viper).htm
http://drdo.gov.in/drdo/Materials/Charg ... learing%20(Vehicle.htm
http://drdo.gov.in/drdo/Materials/Mine% ... (MAPI).htm
http://drdo.gov.in/drdo/Materials/Rocke ... arance.htm
http://drdo.gov.in/drdo/Materials/Rocke ... RAMBS).htm
Re: Conduct your own war
thanks for confirming that we do use the viper system. a man hauled version of this was used by the allies in WW2 itself. it has been a persistent pain point for me over 14 yrs why we dont see it in IA. finally some "closure"
Re: Conduct your own war
Another teaser while the generals try and sort out the DCB canal problem
A company commander is tasked with advancing into an area of territory somewhere up ahead en route to capturing a bridge further ahead. It is not known if there are any enemy positions there or not. There may be, there may not be. He gives the task to 3 platoons, A, B and C to move forward cautiously.
The platoons advance in line abreast. Each platoon is separated by a distance of about 300 to 500 meters. Platoon A is on the extreme left. Platoon B in the center and platoon C on the extreme right. Platoon A has some bushes for cover, B is using some uneven ground and C has some trees.
Suddenly Company B comes under blistering heavy automatic weapon fire. They lose one man and are pinned down. The source of fire is "up ahead" and not visible. Companies A and C can hear some fire way off ahead, but are not facing any direct fire.
What should the leader of Platoon B do?
Re: Conduct your own war
call in his support 81mm mortar team to lay 60 rounds on target within 1 min.
Re: Conduct your own war
They don't know where the target is. They have been spotted. One man killed. They don't even know if it may be friendly forces firing on them by mistake. They cannot simply call in mortar fire without talking to their company commander who gave them this job.Singha wrote:call in his support 81mm mortar team to lay 60 rounds on target within 1 min.
Re: Conduct your own war
shiv ji, for starters won't it make sense for the Coy commander to send 2 platoons separated in sections and hold one platoon in reserve ?
I don't see what B or his coy commander can do except try to get more info. ask A and C to move forward and check the source of fire.
I don't see what B or his coy commander can do except try to get more info. ask A and C to move forward and check the source of fire.
Re: Conduct your own war
Shiv,
Why is the company advancing all up with no reserves (assuming a triangular organization)?
Why are the platoon operating so far apart that they cannot support each other.
Why wasn't a route reconnaissance done prior to the march?
What should B do? Short of sending a guy to frag the CO's ass? Doctrine might ask them to take cover, assess situation and lay suppressive fire allowing the flank elements to maneuver or otherwise develop the situation. In reality they should just sit tight and keep their heads down. They walked into an ambush, they are lucky the enemy was incompetent and they just got one man down. They shouldn't push their luck. Let the Coy CO deal with the problem. B's job is to limit casualties.
Re: Conduct your own war
So what does B actually do in the absence of insight and introspection about all these things? In other words what might you do in the situation?Badar wrote:Shiv,
Why is the company advancing all up with no reserves (assuming a triangular organization)?
Why are the platoon operating so far apart that they cannot support each other.
Why wasn't a route reconnaissance done prior to the march?
What should B do? Short of sending a guy to frag the CO's ass? Doctrine might ask them to take cover, assess situation and lay suppressive fire allowing the flank elements to maneuver or otherwise develop the situation. In reality they should just sit tight and keep their heads down. They walked into an ambush, they are lucky the enemy was incompetent and they just got one man down. They shouldn't push their luck. Let the Coy CO deal with the problem. B's job is to limit casualties.
Re: Conduct your own war
hold his main body of troops till he or his CO is able to send a small recon force to check the source of fire.
Re: Conduct your own war
I think B platoon leader must radio back to the company commander that he is under fire. He could also try and communicate to the left and right to see if those platoons are under fire. Either way it may be possible for the platoons on the sides to advance as they were tasked to do. if they too come under fire it means that the enemy defences are wider and more alert. If they face no resistance then they may be able to outflank the source of fire bearing down on B platoon no?Rahul M wrote:hold his main body of troops till he or his CO is able to send a small recon force to check the source of fire.
Re: Conduct your own war
Badar, since Shiv specifically stated the fire is coming from "up ahead", which means that its not exactly an ambush, but rather contact with enemy defenses. This is something that is anyway expected.
Shiv, you said the platoon is pinned downed. Which means that they are taking continuous fire. Or are you saying that it was a short burst of fire which got a man down. The platoon hit the ground, but doesn't know from which direction the fire came?
If case 1, then the continuous fire would reveal the location of the fire, hence moves planned accordingly. If case 2, then scan the ground ahead as carefully as possible. If the man hit was in the middle of the line, get a couple of men from one of the flanks to move ahead 20-30 ms and check. If the man down was in one of the flanks, get somebody from the middle to recce 20-30 ms ahead.
At the same time, check the situation of the man who took a hit. If he is injured, assess his injury. If the fellow cannot move, inform company commander about it. If CO is sending stretcher bearer, then leave a man with the injured one, or if necessary ask 2-3 men to carry the man back. If he is dead, leave him where he was, marking the spot down. Inform the CO to get the body back.
However, Shiv, I feel going in line breast formation into a territory, where the enemy disposition in not known is wrong. I would rather go in a echelon formation, like a ^. What this does is that, I have a section in vangaurd, with the other section on the wings. what this does is that if the van comes under fire, the two wings can try to flank the fire. If any of the wings come under fire, the van which is ahead, can flank the enemy fire. Also because of the natural shape of the formation, the whole platoon cannot come under enemy fire at once. Also, in a line abreast formation, if, let's say, the left flank section comes under intense fire, the right flank section, has a lot of ground to cover, before it can provide help/relief. In the echelon, the right flank has lot less ground to cover, hence can get into the fight much more quickly.
Re: Conduct your own war
bmallick, you are right; I misread Shiv's post. I was thrown off by the word pinned as well and took off from there.
Shiv, bmallick has it right. Order your squads to figure out the contact line, rough estimate of whats ahead of them. The troops could glean a lot from the sound of weapon fire - how many sustained fire weapons are ahead will give you a very good idea of what you are facing. The weapon sounds might be distinct enough to build a working hypothesis about who is opposing you (Friend or foe). If the platoon is only under fire and not really pinned, then it might be a good idea to pull back one squad or elements there off for flank security until a better picture emerges about the threat ahead and its intentions.
Shiv, bmallick has it right. Order your squads to figure out the contact line, rough estimate of whats ahead of them. The troops could glean a lot from the sound of weapon fire - how many sustained fire weapons are ahead will give you a very good idea of what you are facing. The weapon sounds might be distinct enough to build a working hypothesis about who is opposing you (Friend or foe). If the platoon is only under fire and not really pinned, then it might be a good idea to pull back one squad or elements there off for flank security until a better picture emerges about the threat ahead and its intentions.
Re: Conduct your own war
Mallick you are right, but consider this. If the apex of the ^ is represented by platoon B and platoon B is held up by fire, within minutes the ^ will become a --- (line abreast). Basically it means that there has to be lateral communication between the platoons as well as "vertical" with the company commander to see what is happening to whom.bmallick wrote: However, Shiv, I feel going in line breast formation into a territory, where the enemy disposition in not known is wrong. I would rather go in a echelon formation, like a ^. What this does is that,
In an extremely advanced networked set up each platoon may have a self identification system that automatically plots position on a moving map and shows the position of each platoon in relation to the others. But that is for the future. The maximum that one could have expected until recently is a two way radio maybe to get in touch with the coy cdr at the back. If the platoon in the center (B) loses its radio what happens then?
Re: Conduct your own war
Shiv, those extremely advanced networks are already operational. A commander could see each individual soldiers position on a MMD, live, if he wished. See the French Felin system which I believe is operational. The US JTRS is another ambitious program, and to borrow Rumsfield's pet phrase - 'really transformational'. I believe a similar system is being cooked for India, but for the life of me I can't seem to remember the program/components name. It integrates and digitizes an individual soldier all the way up to the Corps Commander. It's the system the FInsas will presumably be integrated into.
If radio's fail, and they will one time or the other, you just use a runner. Someone will have to crawl back with a report to the Coy HQ the old fashioned way.
As for echelon formation, the point or lead formation sets the march pace and the wings are responsible for keeping station. If the lead formation stops, the wings will stop too. In this case as there is a fusillade of automatic fire the platoons on the wings will also hear it and see that the lead platoon has taken to ground. They too will stop, take cover and not necessarily close the enemy in resulting in a --- formation.
Re: Conduct your own war
Shiv, as Badar said, the transition of an echelon formation ^ into a line abreast one ---, if van is under fire would depend on a lot of factors and is not an automatic choice. It would depend on the terrain, the cover available, enemy position, doctrine and prior planning. Also communication between the platoons is not limited to radio. If radio fails, they can use runners to do the job, or good old fashion hand signals. Such lateral communication have been happening since the late WW1 and platoons have been coordinating their movements quite effectively.
Modern communication networks with computers & maps, is only facilitating and increasing the pace & pervasiveness at which the information flow would occur. It doesn't mean that such information play does not happen now. It does, but at a relatively slower rate. The challenge I guess for commanders is to refrain from micromanagement now that they can see what each NCO or field officer is doing.
Modern communication networks with computers & maps, is only facilitating and increasing the pace & pervasiveness at which the information flow would occur. It doesn't mean that such information play does not happen now. It does, but at a relatively slower rate. The challenge I guess for commanders is to refrain from micromanagement now that they can see what each NCO or field officer is doing.
Re: Conduct your own war
Rohitji, assuming BLF commander gets below info from his UAVs;
1) What is the disposition and strength of your forces Westwards of the ridge?
2) Fortification, defences if any Westwards of the ridge (say between gap and city)?
3) Type of Defenses Between ridge and canal?
4) Disposition and strength of forces between ridge and canal?
5) Strength at the canal?
6) Strength between canal and DCB?
7) Strength at the DCB?
8 ) The air defense scenario for the whole sector? I am aware of Manpads at the ridge which screens out low level intrusions. What about medium and high altitude air defense?
Also, if anyone could point me to the effects of breaching the canal and flooding the land between canal and DCB? I am trying to get an idea of the effect.
When I was reading up on defense in depth I came across an article about obstacles a defending force could set up. A very interesting read especially for the uninitiated. It shows what a daunting task an assaulting force faces.
http://www.globalsecurity.org/military/ ... 02/Ch6.htm
Re: Conduct your own war
Great thread. Pity it seems to have fallen asleep for a week or so.
I have very "time-pass" knowledge about military hardware compared to many on the mil forum, but I'll attempt an answer. Essentially, most of the recommendations made by Badar for the Blue side seem right on the money to me.
Some thoughts:
1) The greatest threat the RLF poses to the battlezone is his artillery and MANPADs on the ridge. I have to suppress that. The one advantage my artillery has over Red's is mobility, assuming I have self-propelled pieces. Red's guns are up on a ridge... great for vantage and concealment (if he can find overhangs) but not so great for mobility. He cannot shoot and scoot too easily, having to lug a 155 mm piece along khacchar trails with ordinance going off all around him. Ultimately in a WLR contest, if I can
(a) bring a considerably larger contingent of arty to bear and
(b) maximize mobility (shoot for 15-20 minutes, move, mass, shoot again... in say three different groups all out of phase with each other so there is a continuous rotation of fire from different positions) I have an advantage over his relatively fixed positions.
2) The one biggest source of initiative to the RLF defender is his ability to flood the entire area at a time of *his* choosing. I want to deprive him of this initiative... so I will try to flood it myself, or make him panic and flood it, as early in the battle as possible. Once that happens we both know the lie of the land... no armour usage possible by either side until the ground drains off... but his biggest card is already played. Also, I want this to happen relatively early, so that the ground will have a chance to drain off by the time I break through and the strike corps I am paving the way for catches up with me.
3) Corollary to (2)... this will not be a tank battle. I am not going to send a large contingent of armour into a flooded zone to be picked off like bogged toads as in Khem Kharan redux. No, this battle will be won by overwhelming artillery, MRLS, heavy attack helos and above all infantry (two or even three battalions against his one.)
Briefly, the plan is:
1) Use artillery to suppress Red forces on the ridge. Continuous bombardment by three groups moving, massing, shooting out-of-phase with each other. I want to take out his arty as fast as possible, and I want his MANPAD teams to be afraid to raise their heads for even 5 seconds. I will also see what I can do to get his MANPAD teams to reveal their positions, maybe by giving "hool" with some UAVs and LCHs.
2) Use MRLS and bund-busters against the bund, and against the bunkers and full-height trenches just on the far side of the DCB. Also have some heavy attack choppers (AH64s?) loitering in the sector between IB and DCB. These will engage all targets in that sector, and aggressively target the trench/bunker network just past the DCB. I will try and lob a few incendiaries into those trenches... anything to keep the enemy's head down. Since my heavy attack choppers will be operating in the IB-to-DCB sector, which is between ~7-10 km from the ridge, I trust they will be mostly out of the effective range of MANPADs on the ridge.
3) MRLS and airstrikes by Bisons/Jags/heavy choppers will concentrate fire to breach the Bund at at least three locations... focusing on dead center, but chipping away at the two flanks as well. When sufficient erosion is evident, I will feint with tanks and BMPs along the center approach.
4) However, the central armoured column will only be a diversion. What I actually intend to do is send overwhelming infantry forces into Red's trench-and-bunker network, on both northern and southern flanks. They will dash the 3kms from IB to DCB in lorries, BMPs, maybe even choppers depending on how I evaluate the MANPAD situation... and then go through the bund breaches into the enemy's trenches on foot. The two-three infantry battalions' mission will be to engage the enemy in CQB within the trench network and secure all bunkers, overwhelming the defences and seizing supplies/weapons/ammo dumps.
The network of bunkers and trenches is important to control before pushing any further. My engaging the Reds in a close-quarter infantry battle for this network also stymies the enemy from using armour or artillery... what are they going to do, fire on areas where their own forces are engaging the enemy?
Yes, I expect it will be very costly in terms of lives of my own jawans. However, there's no way to win this battle in the given time limit without incurring substantial losses. I have no option but to commit my infantry like a Chinaman...this assault is necessarily going to be a combination of high-tech and human wave. My job is to make sure that every sacrifice counts.
Once the trench-bunker network is taken, I will order my forces to flood the DCB (if the earlier breaching hasn't already caused this, or the enemy hasn't done it already.) This will slow down any armoured counterattack that Red might stage to recapture the network.
4) At the same time, I want the entire enemy force committed to Zariwala gap to feel isolated. If I can call in airstrikes on the road between RRN's position and the gap, and even lob some incendiaries into Zariwala town itself to sow FUD, I will. I'll also make full use of ELINT and jammers as Badar has detailed.
A crucial goal of airstrikes will be to ensure that enemy positions on the ridge are not able to be resupplied with ammo for their artillery pieces and MANPADs.
Air and artillery strikes will continue unremittingly against Red positions on the ridge, and now that the DCB is breached my MRLSs and heavy choppers will target the ridge as well. If I see that the Red forces on the ridge have been whittled down to only two or three positions still firing, I might even try to heli-drop some SF teams up there to spike the remaining positions.
5) Once the threat from the ridge is fairly well neutralized, I will occupy the ridge itself with more heli-dropped infantry. At the same time, I will send engineer Coys in BMPs to cross the flooded sectors between IB-DCB and DCB-Canal, where they can go to work bridging the canal unmolested by Red forces on the ridge.
6) If the flooding occurred early enough, I may not have to wait too long for sufficient drainage to occur so that my armour can go through, cross the bridge and charge through the Zariwala Gap. That is an unknown, of course, but if the Reds were primed to flood the area with explosives anyway, it was something we would have had to contend with in any case.
Armour plays hardly any role in this battle plan, other than covering the motorized infantry dash across the IB-to-DCB sector with a feint, and then waiting in reserve until such time as flooding is accomplished.
Let me know what you all think! On the other hand, I'm not sure I want to know!
-
keshavchandra
- BRFite
- Posts: 265
- Joined: 05 Dec 2008 22:23
Re: Conduct your own war
The current war scenario in terms of net cost and affordability is some how projected in the time frame of next one decade but the core will change drastically after and on this I need some views from all seniors...
Like on average as per current economy stands we can fight for 45 ~ 50 days in one stretch. And this figure is wastly depends on many factors but as I think it will depend mainly on the fuel cost and its consumption(As it is the most variable and limited resource). So as I calculate on a very small scale, on average a T-90 consumes 4 ~ 5 litres for one Km, and we may assume that a standard distance a tank runs in war may comes around 40 ~ 50 Km per day. So a net consumption per tank will come around 160 ~250 litres per day or 6400 ~ 12500 litres for whole war span. Now the final operational cost(here we are taking fuel as the basis of cast as it is the main variable determinant).
The cost of fuel will depend on many factors after one decade, like its feasibility will directly proportionate on the diplomatic and political situations rather then economic. But it is so sure that the cost of war will be so high that what ever country economic and political situation, the span of full war on every front will come under a limit of 5 to 10 days maximum.
Re: Conduct your own war
http://en.wikipedia.org/wiki/Byzantine_fault_tolerance
Interesting to think about such commander ABC problems in such war situations. If one reads from the early solutions, it is very much possible with present day scenarios.
Interesting to think about such commander ABC problems in such war situations. If one reads from the early solutions, it is very much possible with present day scenarios.
I would see high value for modern day solutions to the faulty generals problem. Highly secured communication still could have this old byzantine problem... unless as said, there is global view from CnC HQ all from one federated place/supreme command.. again chained back to some public view.It can be shown that if n is the number of generals in total, and t is the number of traitors in that n, then there are solutions to the problem only when n is greater than or equal to 3t + 1.